Wednesday, June 30, 2010

attack of the hornworm caterpillars

during the night my tomato plant was eaten alive!
by TWO tomato hornworm caterpillars. YIKES! they're huge! 4" long!
i thought i might just pluck them off...but they've already eaten the tomatoes, stems, leaves...
i decided to just let them finish devouring...as there's no hope for the plant!
then again if i leave them...they'll just lay more eggs and they'll still be hanging around when i replace my tomato plants this weekend. i just can't seem to be able to pluck 'em and kill 'em....even though they're considered a pest. here's a picture of the adult hornworm moth (pic courtesy of UF).
 at least we had many tasty tomatoes!!  :]

Sunday, June 27, 2010

the red-headed woodpecker!

this is a rare sight! we have the red-bellied and pileated woodpeckers in our yard all the time...but for the past week or so we've seen a NEW woodpecker...the elusive red-headed woodpecker. we've been trying to get some good pictures...and FINALLY...this afternoon...he posed for us!!
the population of this bird is on the decline.  want to read more and see awesome pictures...check out this link: florida nature photography
or go here for more info: identify whatbird

sandblasted tree mirror- from start to finish!

the Tree Mirror is finished!
to make things a little easier...so you don't have to go back through my posts...i'll put a few pic's here, going back through the process of getting to THIS!
it all started with a freehand sketch of a tree...i then used graphite transfer paper to copy the tree from paper to the 'contact paper' covered mirror. the design is then cut with x-acto knife and peeled away to make a stencil on the back of the mirror. i want the stencil on the back because that's where the silver coating will be etched out during the sandblasting...making the mirror 'see-through' where the tree is.
(am i confusing you yet?? i hope not!!)
then comes the sandblasting...sam takes care of this part...
after this step...the stencil is peeled...mirror is rinsed. then i paint the wood plaque, giving it a white base coat first, then whatever color i decide. i spray an acrylic coating on the painted plaque before the mirror is mounted (masking off the area where the mirror will be glued). let it cure overnight. meanwhile i paint the tree on the back of the mirror so the colors can be seen through the front of the mirror.  
mirror is glued to the plaque...i added some glass paint & wrapped suede lace around...
hmmm, now to come up with a name...

The creation of a thousand forests is in one acorn.-  Ralph Waldo Emerson


Saturday, June 26, 2010

butterflies and trees


i slept in today!! well, i did wake up at 3:30, but when i saw what time it was...i told myself to TRY and get back to sleep. i didn't think i could. but i did. and woke this morn at 5:30! for me, that's sleeping in!!
yesterday i was working on the sandblasted mirror trees...painting them...getting the wood ready to mount the mirrors. i realized that since the 'etched' area of this tree design is so much more intricate than the 'words' i've sandblasted on mirrors...painting the wood plaque won't work! the colors don't show through the frosted tree! so i painted the back side of the mirror...over the etched design/frosted glass.
this is the back side/etched side of the mirrors:
this picture shows back side and front side. you can see the colors through the etched design.
i've painted the wood plaques...one a light blue, the other cobalt. today i'll clear coat the plaques, then after drying, will mount the mirrors!
here's something else i was playing around with while working on the trees. (sorry for the flash glare!) - beveled glass with butterfly & dragonfly wings & pressed flowers. i'll probably put some type of border on it and make it into a window hanger.  


front


back


It has been said that something as small as the flutter of a butterfly's wing can ultimately cause a typhoon halfway around the world. ~Butterfly Effect

Friday, June 25, 2010

up before dawn

...again. every day i don't have to get up for work...i'm up even earlier. it's my favorite time of day...quiet. dark. little by little...light...starts creeping around the corners of the doors and windows. if i sleep in...i feel like i've wasted some of the day, and since there never seems to be enough hours to get everything done...well, here i am...
this old ceramic barrel (or whatever it's called), sits on our front porch with a false bottom inside so i could fill it with bones and other found 'treasures! the false bottom makes it look as though the whole thing is filled with found stuff!!
picture mix...around the house...


our kitty 'milo'
our oscar 'ozzie'
and our python 'monty'  :)
Be who you are and say what you feel, 
because those who matter don't mind, 
and those that mind, don't matter.   
~~Dr. Seuss


Thursday, June 24, 2010

sandblasting (part 2)

in the previous post i showed how to get the mirrors ready for sandblasting. ok...now we're ready...cause Sam's ready!!  :)  he does the sandblasting...so when he's ready...i'm ready!!  :)


here's the sandblasting cabinet.


hands go inside by way of HEAVY gloves...one to hold whatever you're sandblasting...the other gloved hand holds onto the spray gun.


cover's closed (fumes!!) and Sam blasts away. the sand grinds into the back surface of the mirror...etching in the design to the open areas of the stencil


open cabinet (vaccuming out the dust) to make sure the design is sandblasted into the mirror enough!


nope!!  it needs a little more...needs to be etched a  little deeper...
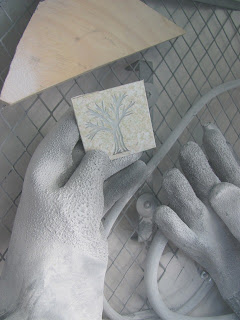


it's finished!!  now it's on to peeling away the stencil (contact paper) from the back of the mirror
((while Sam has one more mirror to sandblast))          


peeled, rinsed off and drying...showing the front and back sides of the 2 mirrors. the sandblasting gives the glass a frosted look where the silver coating was etched away...


i gave a white base coat to the wood plaque

and now i start to paint the wood...eyeballing where the tree will be positioned when the mirror gets glued to the wood!!  i'll paint, let it dry...repaint, again and again...adding different shades...until i see that the colors are just how i want them to be when they show through the frosted glass of the mirror!!
SEE???  sometimes i get the urge to do something other than BoNES! ha!  
((i'll post the finished piece when completed!!))

Wednesday, June 23, 2010

before the sandblasting (part 1)

so i started preparing the mirrors for sam's expert sandblasting :)
drawing a tree 
wrapping the mirror with 'contact paper'
transferring the drawing using graphite paper 
cutting the design with x-acto knife
since the design gets stenciled on the back of the mirror (because that's where the silver mirror finish is), you have to remember that the stencil has to be applied backwards...which doesn't really matter with a TREE, but if you're doing a WORD...it matters! :)

i did 2 mirrors. on the mirror to the right  i just  freehanded the tree, cutting out the graphite transfer step.
i'll post again as i paint the wood plaques and after the mirrors have been sandblasted!  >:)


a slow work day - may do some stencil cutting...

today is another slow work day (only ONE massage scheduled for later this afternoon!!) so  i thought i might do some stencil cutting for sandblasting...on mirrors. i've done these TREES on clear glass window hangers and then added pressed flower petals as the tree leaves.

but now i might try to do the same sandblasted tree...but on a mirror...and then glue it to the 4X4" wood plaque after i paint it...so you can see the colors through the tree.  kind of like what i did here...with the butterfly...

wow...i sure need to try and get better pictures of my mirrors and clear glass art...got any suggestions??
((i do the artwork & stencil cutting...sam does the actual sandblasting!))
a few posts ago...the one with the dreamcatchers...i said i'd look up the place where i bought the turtle shells. here it is...and they have some really cool stuff there...crazy crow 
here's another site where i've gone to look up Native American totems & the meanings of different animals & symbols (and more!)  -  legends of america . 
that's it for now...


Tuesday, June 22, 2010

a RanDoM QuoTe II

((some of my inspiration comes from 'quotes'.))

Look deep into nature, and then you will understand everything better.  ~Albert Einstein 


Monday, June 21, 2010

AWESOMELY WEIRD!

mmmmmwwwwwwaaaaaaahhhhhh!!!!!!!!!!!!  i made it into an etsy treasury today!! it's a treasury of  Awesomely Weird  stuff!  i thanked them for (finally) finding me! and to let them know that i have way more weirdly awesome BoNE ART  in my shop!! >> in this treasury they included a listing of my UNdecorated bones! well, i guess if you're going for the macabre...scary...ghoulish...those bones i have pictured sitting on some snake shedding...was the way to go!  so go check it out!!  i'm weirdly thrilled! :]

http://www.etsy.com/treasury/4c1f7d1abd2f8eeffd394568/awesomely-weird

pulling teeth & old dreamcatchers

i had a good weekend (between raindrops) prowling for BoNES. for my art. i found some old weather-beaten deer jawbones, which aren't in good enough shape to decorate...but i'll be pulling teeth!!  i use the teeth for my "Scenes from  Planet Beenderen" series (look back at my previous posts for the Beenderen art).  and i also found a bunch of small deer vertebrae bones which i still need to clean.


i've posted pictures on here of the cow skulls i have in my gardens. here's a picture of the top of one of the skulls...you can see how the squirrels love to sit on top and chew away at the bone...(somewhere i have a pic of a squirrel sitting on top...gotta look for it!)

~~a couple of years ago i got into making dreamcatchers. this one is made of wrapped vine, jute cord, beads and turkey, guinea and craft feathers.~~

~~and this one i cut up an old 'tribal' design t-shirt and stretched it onto one of those embroidery or needlepoint circular frames...then added feathers and beads~~

~~i bought a few turtle shells from a Native American craft supply house and made this from one of the shells. drilled holes and strung leather & beads & feathers~~

well i have an almost full day of massages today and have to drive an hour to get to them. so i better get ready. i wanted to get this post on here cause i'd been thinking about it during the night! i'll look for that squirrel and skull pic...and also the link for the native american craft supplies and post it later on.
have a good one!